
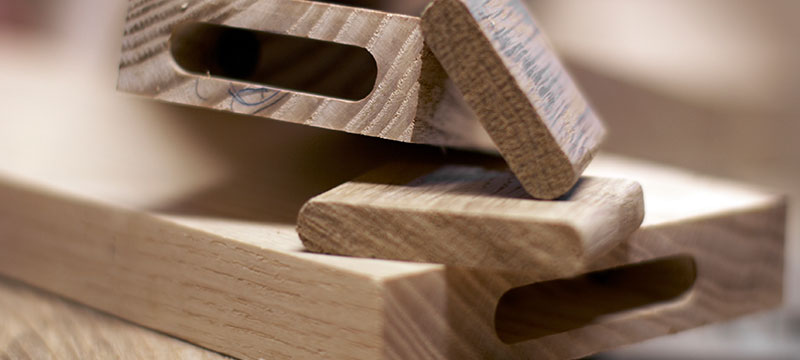
What is a Mortise and Tenon? The mortise-and-tenon joint has long been the “gold standard” in woodworking joinery because of its ease of construction and incredible strength. It consists of a tenon (also called a tongue) on one workpiece (such as a door rail) that fits into a hollowed-out mortise of a mating workpiece (such as a door stile).

To make a mortise and tenon joint, always cut the mortise first because it’s much easier to cut the tenon to fit an existing mortise than the other way around. So let’s start by learning three fast and effective ways to cut the mortise, which is typically a rectangular hole.
Chisels

No matter how you cut a mortise, you’ll need chisels to smooth and square its walls and corners.
Start with a chisel as wide (or nearly as wide) as the mortise ends and use it to square both ends of the hole. Then, clean up the side walls with the widest chisel that fits into the mortise. For the ends and side walls, keep the flat face of the chisel against the mortise wall as you work.
Mortise and Tenon Methods
Method #1: Drill the mortise.
If you cut mortises only occasionally, simply rough them out using a drill press to make a series of overlapping holes. Then square the mortise walls with chisels. Start by installing a brad-point bit or Forstner bit in your drill press. (Note: The use of a hand drill is not recommended for this operation due to accuracy concerns.)
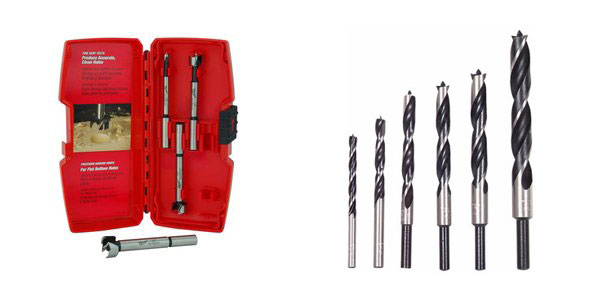

The diameter of the bit should equal the width of your mortise. Set the depth stop on your drill press to match the depth of the mortise. With a sharp pencil, mark the position of the mortise on your work piece. Then, align the bit with the layout lines at one end of the mortise and clamp the work piece to the drill-press table. Drill the first hole.
Then, unclamp the work piece and reposition it for the next overlapping hole. Continue this process until you reach the other end of the mortise.

You can also use a mortising attachment with your drill press. Your investment in this accessory will pay off in faster mortises with walls that need much less chisel work. It effectively turns your drill press into a mortising machine (see Method #3), though the results will not be quite as fast or precise as those you get with a dedicated mortising machine. And, you’ll need to reinstall/remove the attachment with each use to resume typical drilling activities.
Method #2: Rout the mortise.

If you own a plunge router you can use it to cut mortises with flat and straight side walls requiring no cleanup. However, the mortise ends will be round, meaning you have to either square them with a chisel or use a “floating” tenon with rounded edges that fit into two identical, mating mortises.
Begin by selecting a straight bit in a diameter that matches the width of the mortise. Install it in the plunge router.

Clamp a guide block to your plunge router to align the router with the marked mortise. The block will guide the router as you make the cut.
Set the plunge depth on the router to cut the mortise to correct depth. Clamp the work piece in place and make the plunge cut. Start at one end of the mortise, and keeping the guide block pressed against the work piece, slide the router to the other end of the mortise. Use a chisel to square the ends if necessary.
Method #3: Use a mortising machine.

If you do a lot of mortising, consider investing in a mortising machine. It will save you a load of time. These benchtop machines utilize specialized mortising chisel/drill bits with chisel edges that form a box around a drill bit. The result is a square hole. Since they are designed specifically for making mortises, set-up is easy and the results are fast and precise.
Many such machines feature an in-line depth stop for cutting to precise and repeatable preset depths. They also have built-in hold-downs to quickly and securely clamp the work piece in place.
As with the drill press method, you drill a series of overlapping holes. Start at one end of the mortise and work your way down to the other end of the marked mortise. The walls will not be perfectly flat, but nevertheless, you may find little need to clean up your cuts with a chisel.
Looking for more ways to cut a mortise? Check out our Tool Tip for another quick and easy way.


5 Comments
Eddie A. Lozada
September 30, 2016 at 3:15 amHI, Tell me the price of your mortising kit and how to order. Thanks.
Acme Tools
September 30, 2016 at 1:20 pmYou can find the Delta mortising kit for a drill press here: https://www.acmetools.com/shop/tools/delta-17-924. It’s currently $109.99.
Molly
February 17, 2019 at 12:48 amWedged Mortise and Tenon This joint will never loosen! By Tom Caspar Tap, tap, tap. The wedges go home, the glue squeezes out and a big smile lights up your face.
Neal
February 1, 2022 at 3:36 pmHello Molly….After the tenon is inserted in the mortise myself personally don’t smile until all the glue is removed and I mean all of it, lol….
Hate cleaning up glue anywhere!
The person who makes a glue that disappears from any joint will be living large!
generic
July 15, 2021 at 12:16 pmYour mode of telling everything in this article is genuinely good, all be able to easily be aware
of it, Thanks a lot.