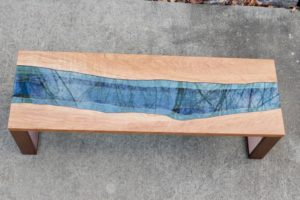
In this article, we show you how to build a live edge glass coffee table, inspired by Greg Klassen’s amazing work. It’s a simple enough project with a few tricky moments, but, with a little woodworking skill, you can build one for yourself. Let’s get started!
Step 1: Gather Materials and Tools
This is a surprisingly tool-light build. If you buy 1x3s for the legs, you can easily flatten the top with a router and make all of the cuts with a circular saw. Nothing particularly fancy needed here!
Tools Used On Live Edge Glass Coffee Table:
Dewalt 20V Max Impact Driver
SawStop PCS 1.75-HP Professional Cabinet Saw
DEWALT FLEXVOLT 12″ Compound Sliding Miter Saw
Supermax 19-38 Drum Sander
¼” x ½” Template Router Bit
DEWALT DW621 2-Horsepower Plunge Router
Wood Whisperer Thread Taps
Materials Used On Live Edge Glass Coffee Table:
ArtResin Epoxy Resin
Minwax Wipe-On Poly, Satin
Bolts to attach legs to top, ¼-20 x 1 ½ in my case
1x3s, for legs
Live Edge Slab, for top
Felt Pads, for bottom of legs
Step 2: Flatten Slab, Cut Slab in Half, & Square Up Ends
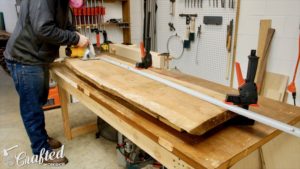
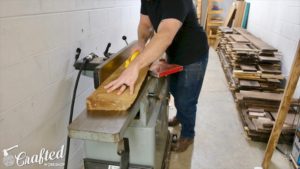
The slab I purchased, for the bargain price of $55, was significantly warped and cupped, so I cut it in half before flattening. If your slab is already relatively flat, you could use a router jig to flatten it before cutting it in half. After flattening, square up the ends with a miter saw or circular saw.
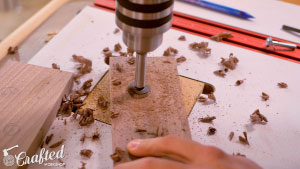
Step 3: Create Template for Glass
I had my glass cut by a local glass company, so I created a template for them using a piece of cardboard. The glass I used was ¼” blue plate glass, and it cost about $100 including the cutting fee. The glass alone was over $70 and I was afraid to break it if I tried to cut it myself. I’ve seen others have success with a glass cutting tool but I didn’t want to risk it.
Step 4: Route Inset Area Into Top of Slabs for Glass
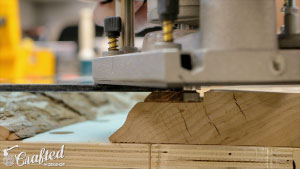
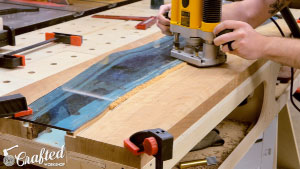
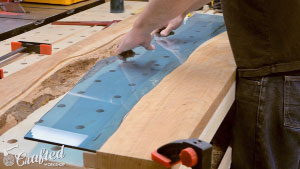
This is THE most critical part of this build. To make the glass flush with the top of the slab, you need to route out an area in the top of the slab to accept the glass. Here’s how I did this:
I secured the glass to the top of the slab using clamps and then used a router and a ¼” x ½” template bit to cut the groove. The router bit rides against the glass and follows the curves. This is inherently dangerous, so wear eye protection and do this at your own risk! After routing this groove, the rest of the waste needs to be removed. I did this with the same router bit and freehanded it, making sure to stay clear of the first groove I cut. Once all of the waste was removed, I cleaned up any of the router bit marks left using a card scraper and sander.
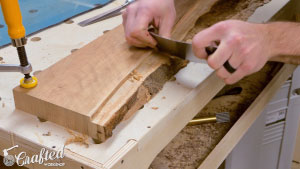
Step 5: Shape Live Edge & Remove Loose Bark
Most live edge slabs will have some kind of loose bark and other stuff hanging from the live edge. It’s best to remove anything that is loose and might fall off later. I used a chisel and spokeshave to remove the bark and shape the edge, then smoothed everything out with a random orbit sander.
Step 6: Sand Slab Thoroughly, Removing Any Tool Marks
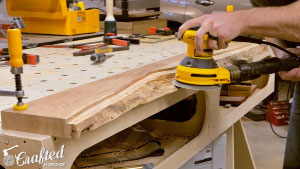
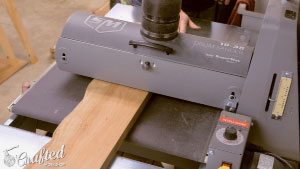
With all of the routing done, I sanded my slab pieces up to 220 grit using a drum sander and random orbit sander. This is the show surface, so take your time and make sure to remove any lines or other tool marks.
Step 7: (Optional) Fill Holes & Cracks With Epoxy
Most live edge slabs will have some kind of cracks or bug holes, and mine was no exception. I used ArtResin epoxy to fill the carpenter ant holes in my slab. I love using ArtResin since it has no fumes and I can apply it inside.
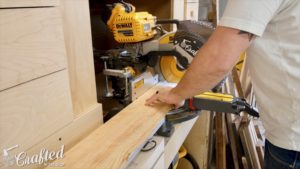
Step 8: Cut Leg Pieces to Size
The sizes of your legs are going to depend on the size of your slab and the height you want your coffee table, but mine ended up roughly 16″ wide by 14″ tall. I used rough Walnut I already had on hand, but you could use 1x3s from the home center if you don’t have the machinery to mill lumber.
If you want to skip building legs altogether, you could use something like hairpin legs.
Step 9: Cut Joinery for Legs
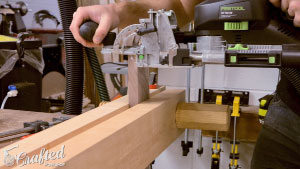

For joinery for my legs, I used my Festool Domino, but there are tons of options for joining butt joints. Dowels, pocket holes, dovetails, finger joints, the list goes on and on. Use whatever you feel comfortable with.
Step 10: Drill Holes Into Top of Legs to Fasten to Top
Before assembling the legs, it’s a good time to drill the holes through which you’ll attach the legs to the top. I am using drilled and tapped holes with bolts to attach my legs. I drilled a countersunk hole with a Forstner bit and then elongated the holes towards the outside of the legs to allow for wood movement.
Step 11: Assemble Legs
Using whichever joinery method you landed on, assemble your legs. Try to avoid as much glue squeeze out as you can, because it will be tedious to clean up later.
Step 12: Cut Channel in Top Edges of Legs
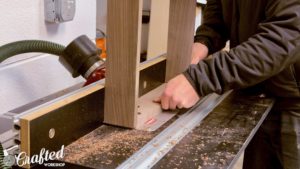 A nice design option on the legs is to route a cutaway along the top outside edges of the legs. I cut mine roughly a ¼” deep by ¼” wide. This cutaway will give the top a floating effect when assembled later on. I just used the same router bit as before to do this.
Step 13: Drill & Tap Holes in Bottom of Top
As I mentioned earlier, I used tapped holes to attach the legs to the top. To tap the holes, I used the new Wood Whisperer Thread Taps, which are a pretty nifty little tool. To tap the holes, you pre-drill with the correct drill bit and then just run the tap into the hole. Super quick and very strong. I used ¼-20 1 ½” long bolts for my table.
Step 14: Finish Sanding & Apply Finish
I sanded all of the pieces up to 220 grit, removed the dust, then it was time to apply finish. This was my first time trying Minwax Wipe-On Poly, but it was a really easy to apply finish. I just wiped on a coat, let it dry for a few hours, sanded lightly with 320 to remove any rough areas, removed the dust, when repeated this step 3 to 4 times. The finish turned out great.
Step 15: Assemble Table
Assembling the table is super simple, just thread the bolts into the holes we tapped earlier and tighten them down. Leave the bolts towards the outside edges of the table slightly loose to allow for wood movement.
Enjoy Your Live Edge Glass Table!
That’s it! Hopefully your table will turn out as nice as mine did, I am super happy with the final result. This is a great build to take your woodworking to the next level and I think this would be a great introduction to a number of new woodworking methods.
-The Video and Blog Post was Created by Johnny Brooke of Crafted Workshop in partnership with Acme Tools. Check out more of Johnny’s work on this Walnut Conference Table or on his website at Crafted Workshop.
Want to let us know how much you liked this post? Click on the start below or leave us a comment. You can always include us in your social media feed by tagging us with #DoYourBestWork. Acme Tools is active on Facebook, Instagram, Twitter, and Pinterest.